Create a more interactive and engaging PowerPoint presentation by making your own quiz competition. There are actually many ways to make an interactive Powerpoint presentation; however, today we are going to focus on designing your own quiz game!
Adding gamification to your classroom allows students to learn in an exciting and informative way. In addition, teachers and students are able to receive real-time feedback on their learning and understanding of the day’s lesson. There are 2 different methods we are going to cover below to create your own quiz game in PowerPoint – one only in PowerPoint, and one using ClassPoint.
Method 1: Use PowerPoint Navigation Links
Turn your quizzes into an interactive quiz game for your students using links throughout your presentation. Your quiz game should include your questions, along with slides that indicate to students whether they clicked the correct answer not.

Add Links to the Question Slide
To start, we need to add links to our first question slide. Highlight the correct answer, then under the Insert tab, click Link. Make sure you are on the tab for linking this text to “a place in this document.” Then click on the slide that tells students their choice was correct.
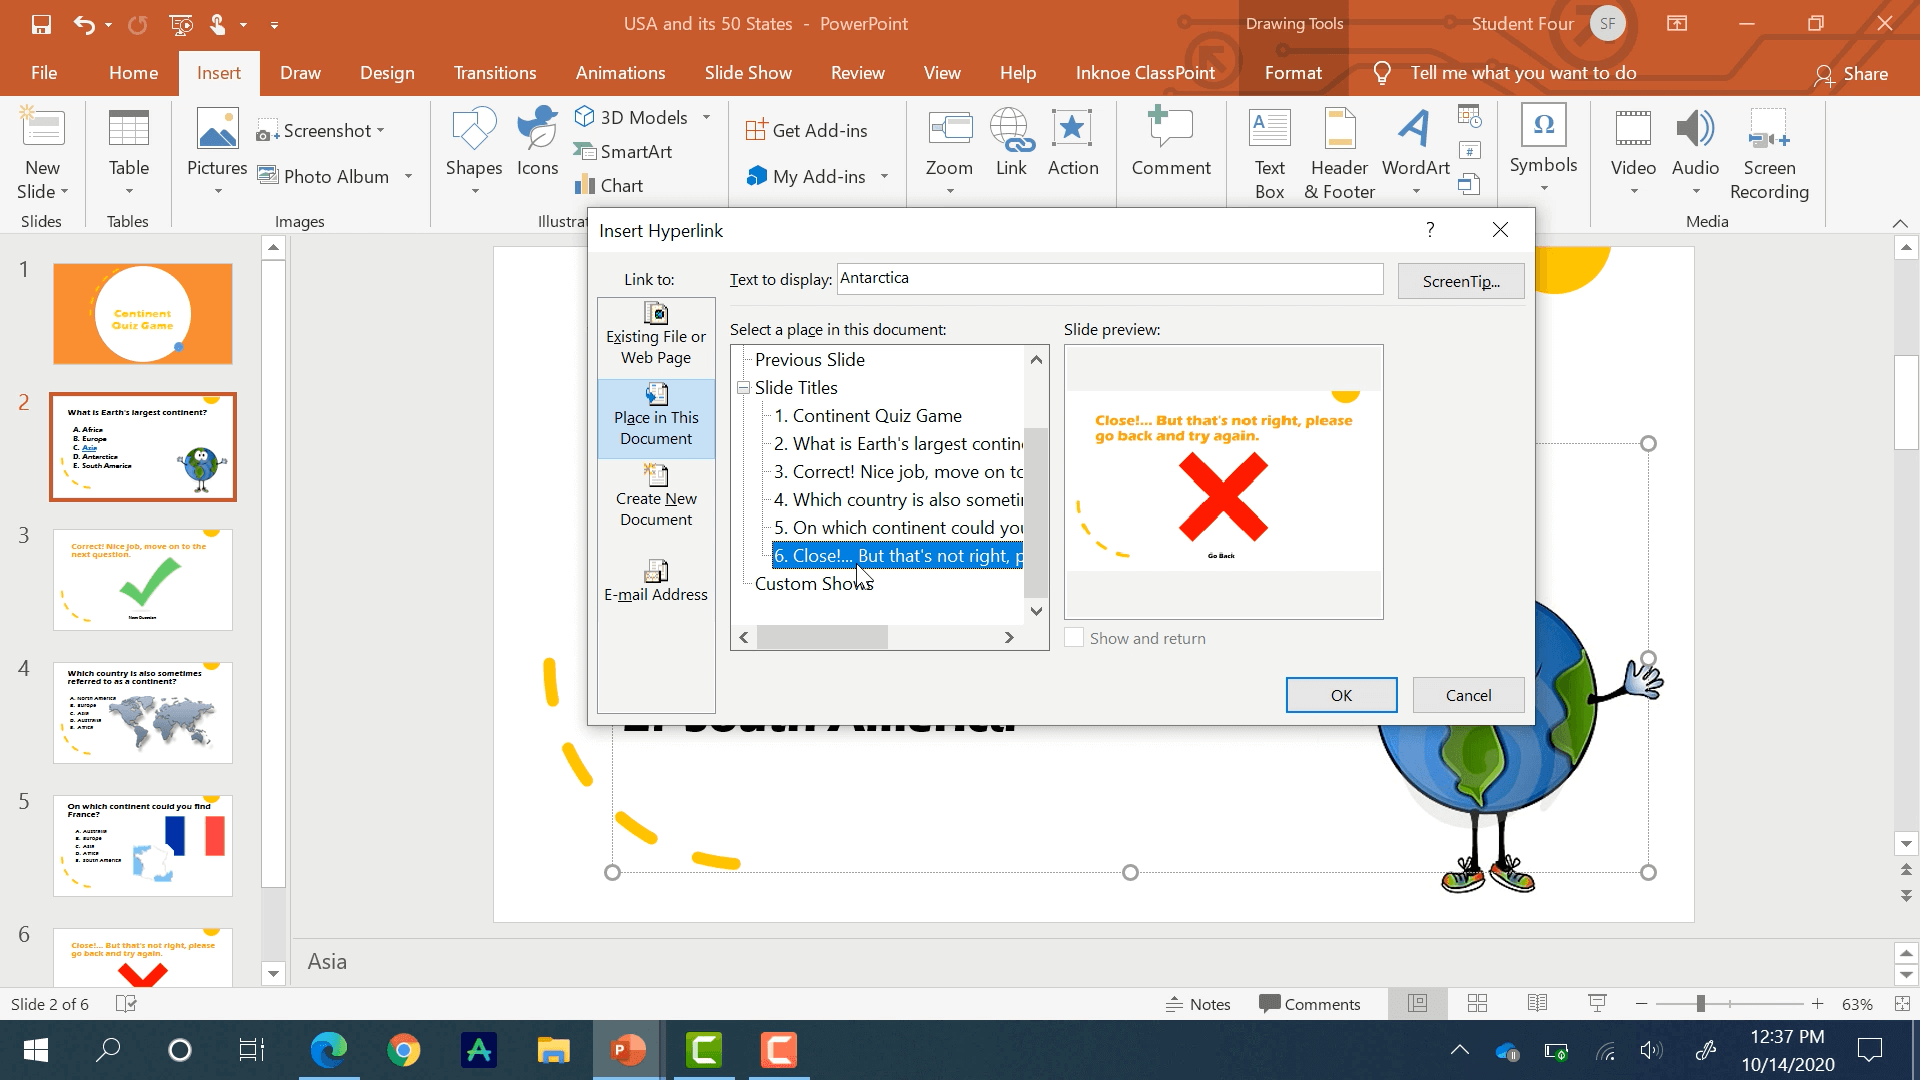
In the same way, do this for all the incorrect choices. However, when you link it to a slide, make sure it is the slide that tells students they did not get the question correct.
When all your answer choices are linked to a correct or incorrect slide, we can move onto linking our correct and incorrect slides back to the questions.
Add Links to the Correct and Incorrect Slides
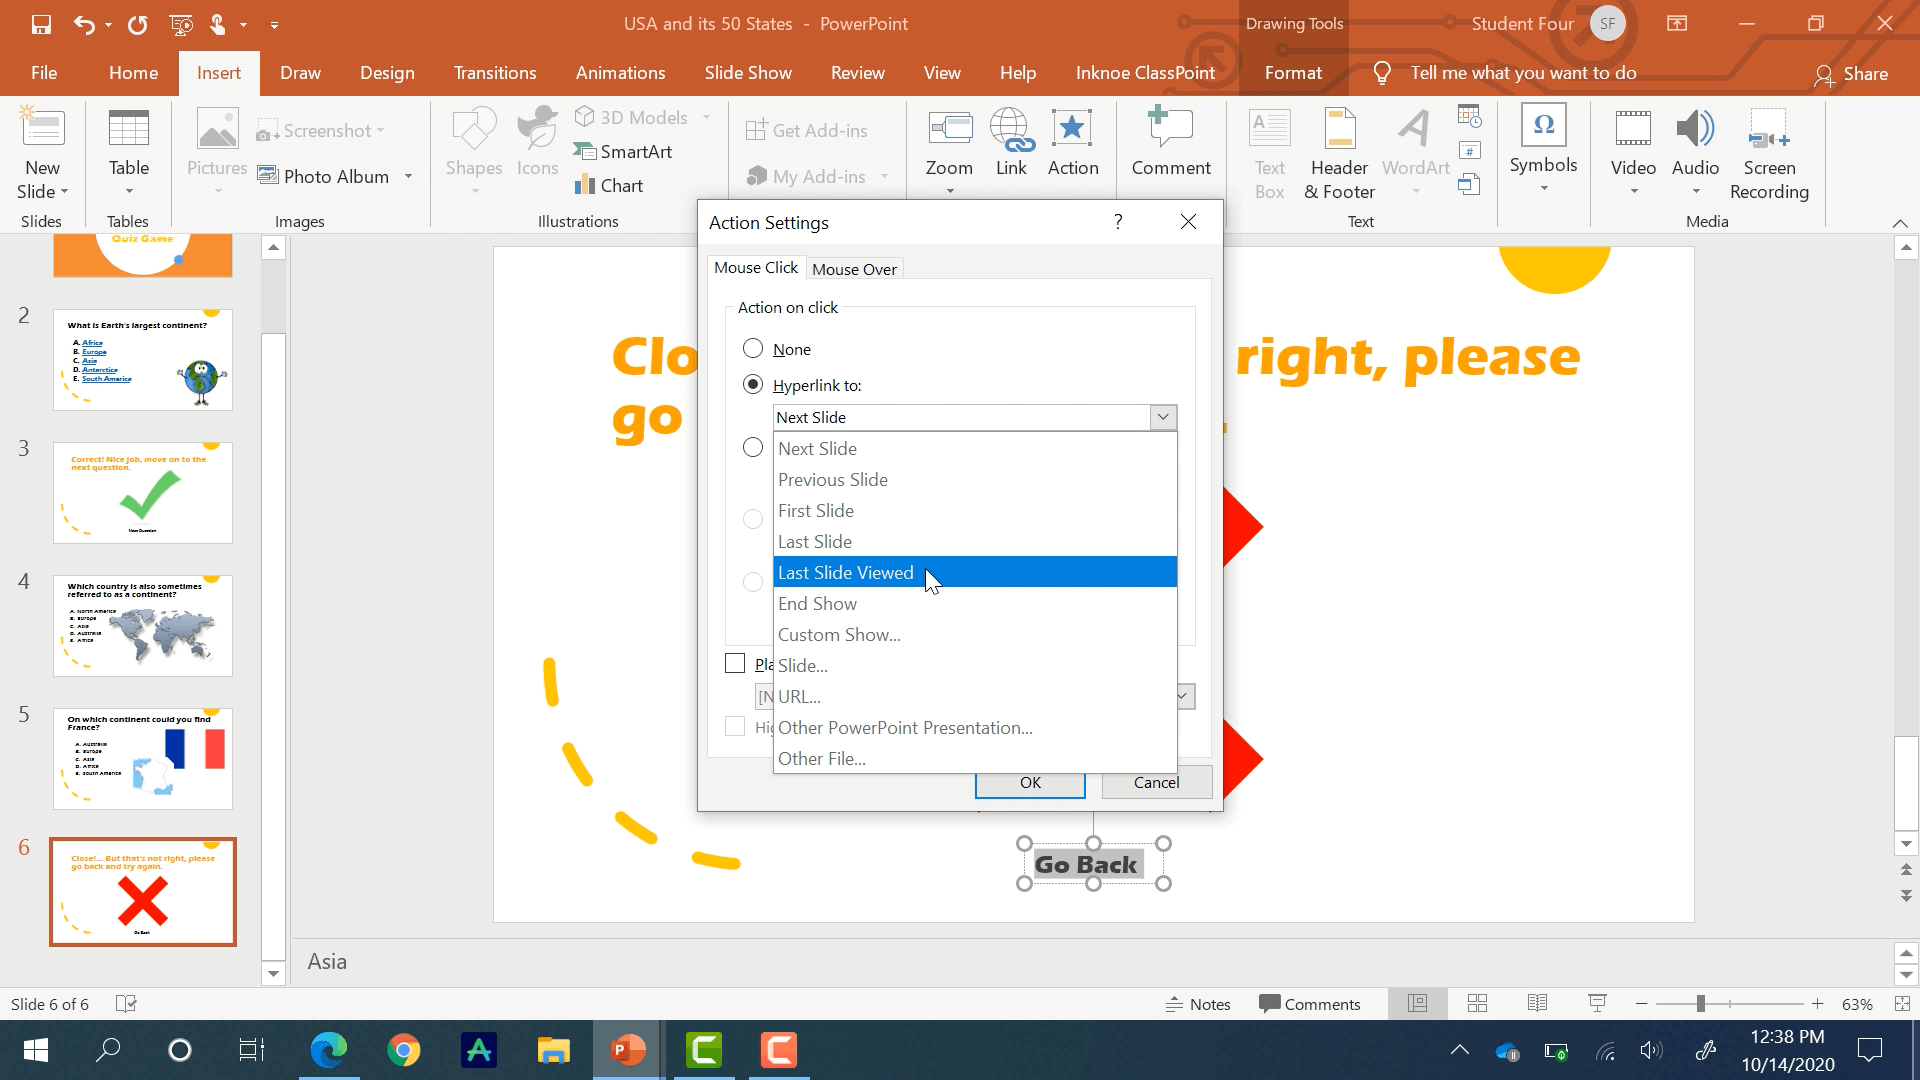
We will start by linking the incorrect slide back to the same questions so that students can try again. Add some text that says “Go back,” highlight this, and this time instead of clicking Link, we will choose Action. Hyperlink this text to the last slide viewed. This way, no matter what question they are on, they will be brought back to the right question slide.
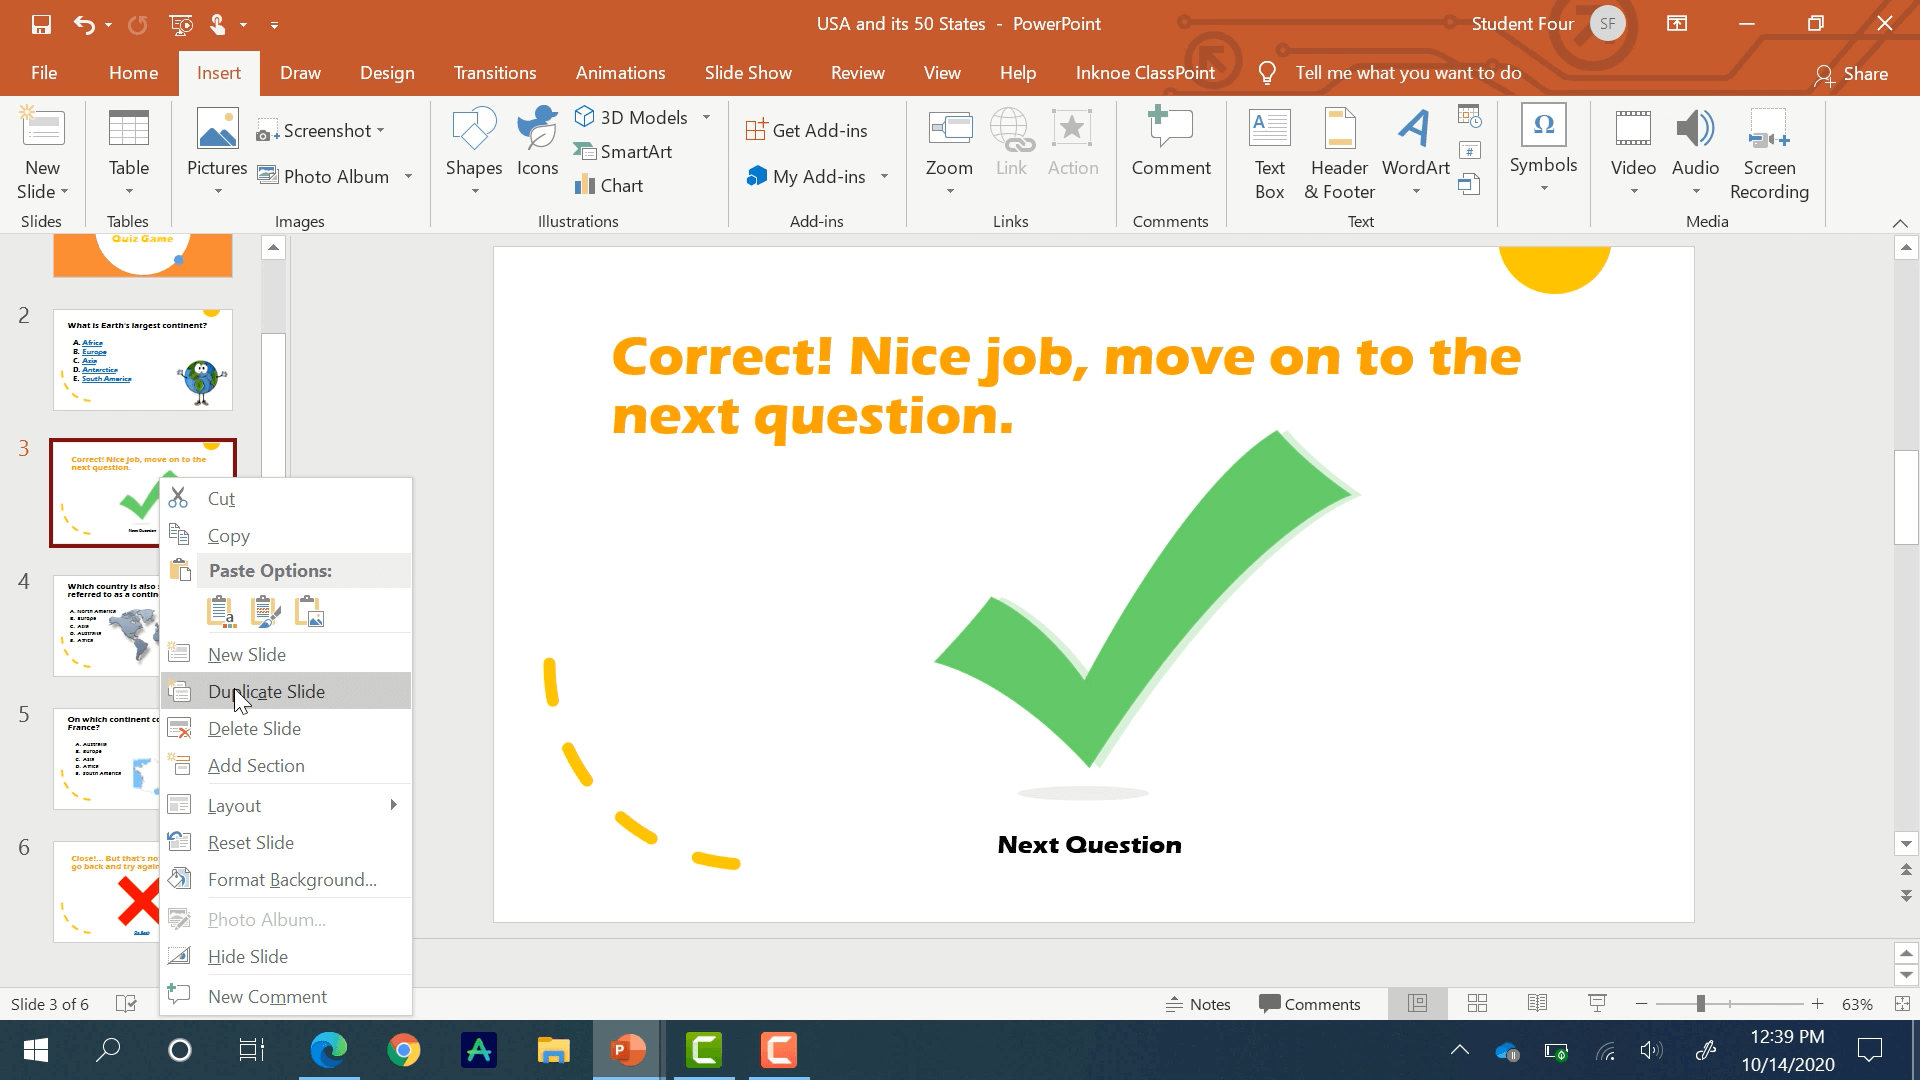
Linking the correct slide is not necessary because students can just use the arrow keys to move to the next question. So make sure you have a correct answer slide in between each question to link to. Easily do this by duplicating the slide and moving it between the question slides.
Go through these same steps for every question in your quiz game. Then, test this quiz game out yourself to make sure everything is linked correctly!
This method is easy to grasp but can be time-consuming, especially if your quiz is lengthy. This quiz can be run with your students, however, you aren’t able to personally assess how each student did by collecting their responses. This brings us to method number two.
Method 2: Use ClassPoint
ClassPoint allows you to create that exact same quiz game, without all the links, in only a few clicks. In addition, you can gain powerful insights into your students’ knowledge.
Add Question Buttons
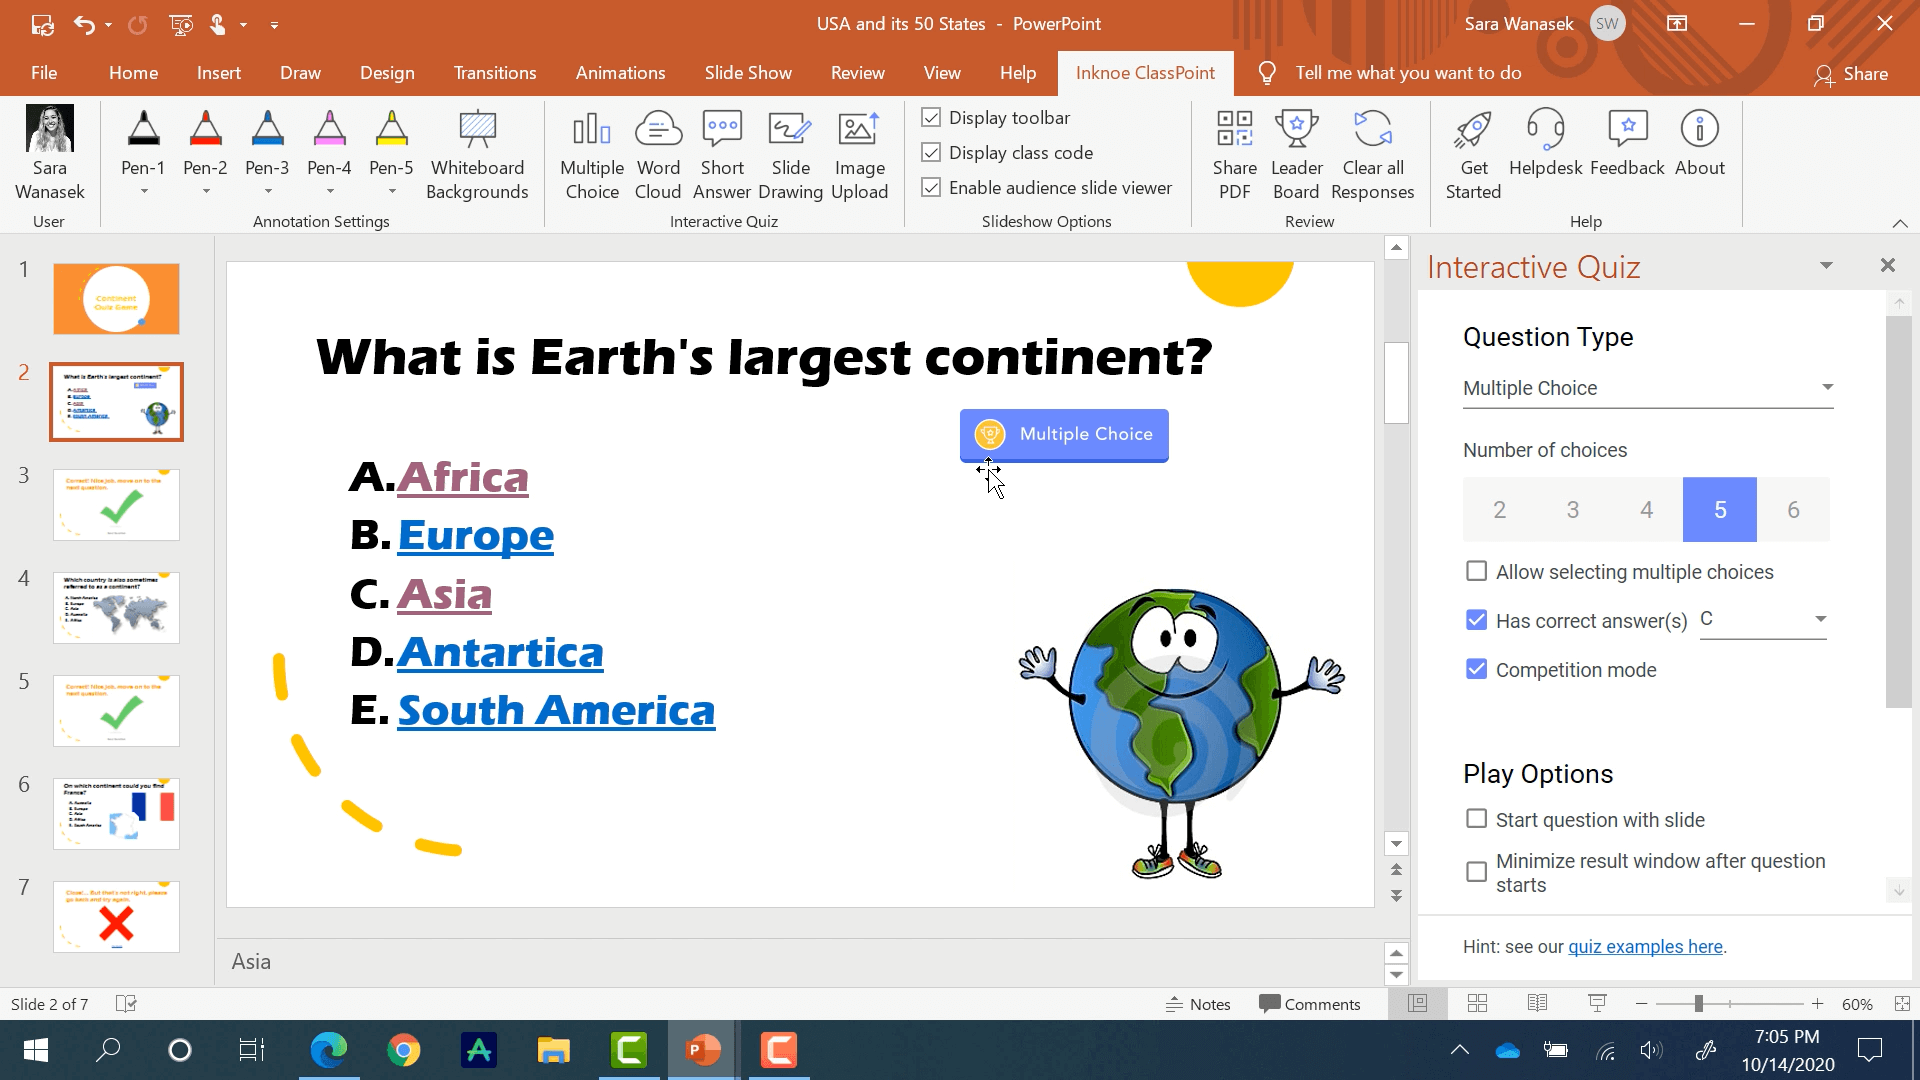
The first step is to add a Multiple-Choice button on your slide deck from the ClassPoint tab in the top ribbon. If you don’t have the ClassPoint tab, download it here.
Select the correct number of choices and the correct answer on the side panel.
Read this Next: How to Make an Interactive PowerPoint Question Slide in less than 1 minute
Most importantly, we need to select Competition Mode. The button on the slide now has a trophy icon meaning that students will be scored and ranked depending on their answers.
Further down, we will use all the Play Options and a timer of 15 seconds to create urgency for students to answer.
Continue this process for each question in your quiz game. That concludes the set up, next we can test it out.
Run the Question Buttons
Begin slideshow and have students join your class. When everyone is joined, begin the first question!
Read this Next: 4 Pro Tips To Let Students Join Your Class Faster
Click on the button to begin receiving submissions from your students. This window can be minimized to see a full view of the slides and hide the responses.
The question button is now yellow and shows the number of students who have submitted their answers, and the countdown timer.
When the countdown is completed, the window will reappear showing you a bar graph of the student results.
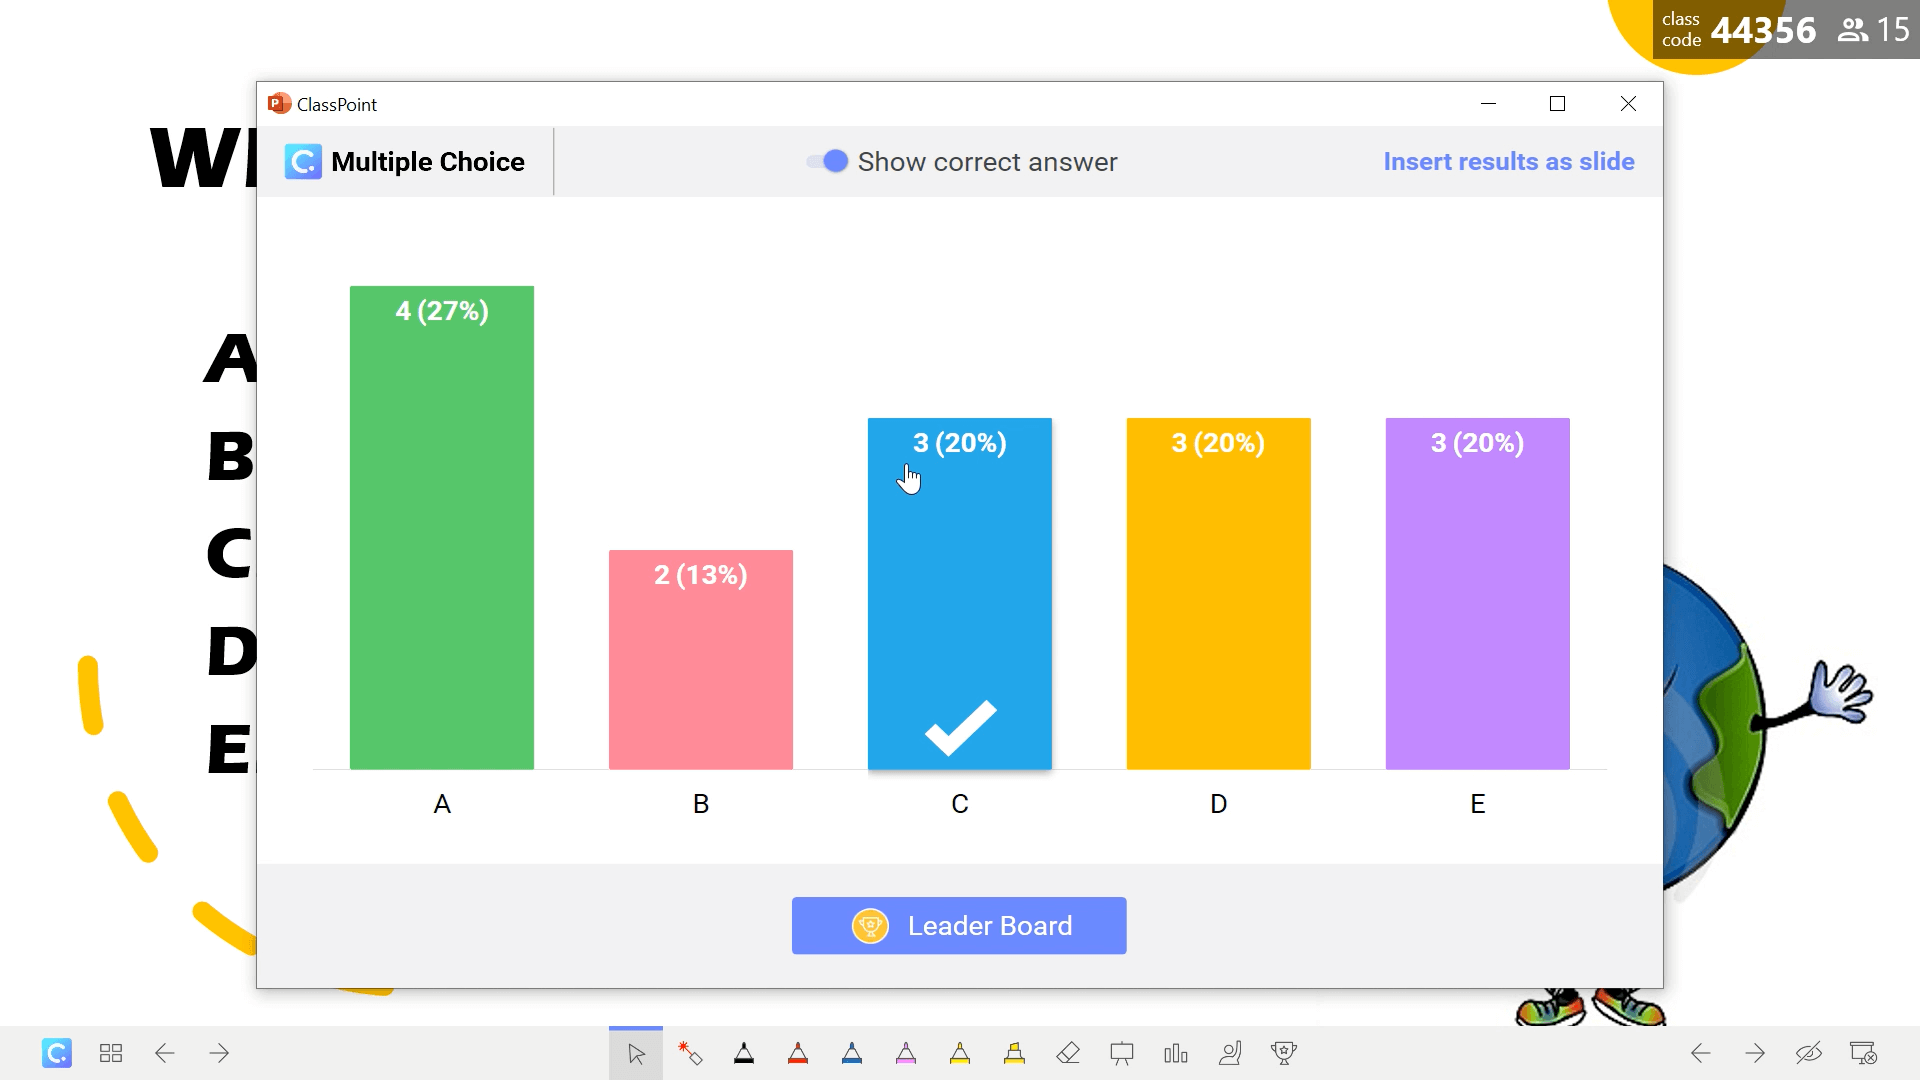
Review Student Results
Each bar will denote the number of students that have chosen that answer, along with the percentage. Each bar can be clicked on to show exactly which students have chosen that answer.
Reveal the correct answer for your students, then you can show the Leader Board. The leader board is scored depending on the speediness and correctness of student submissions. This makes the game more exciting because every question is an opportunity to move up in the rankings.
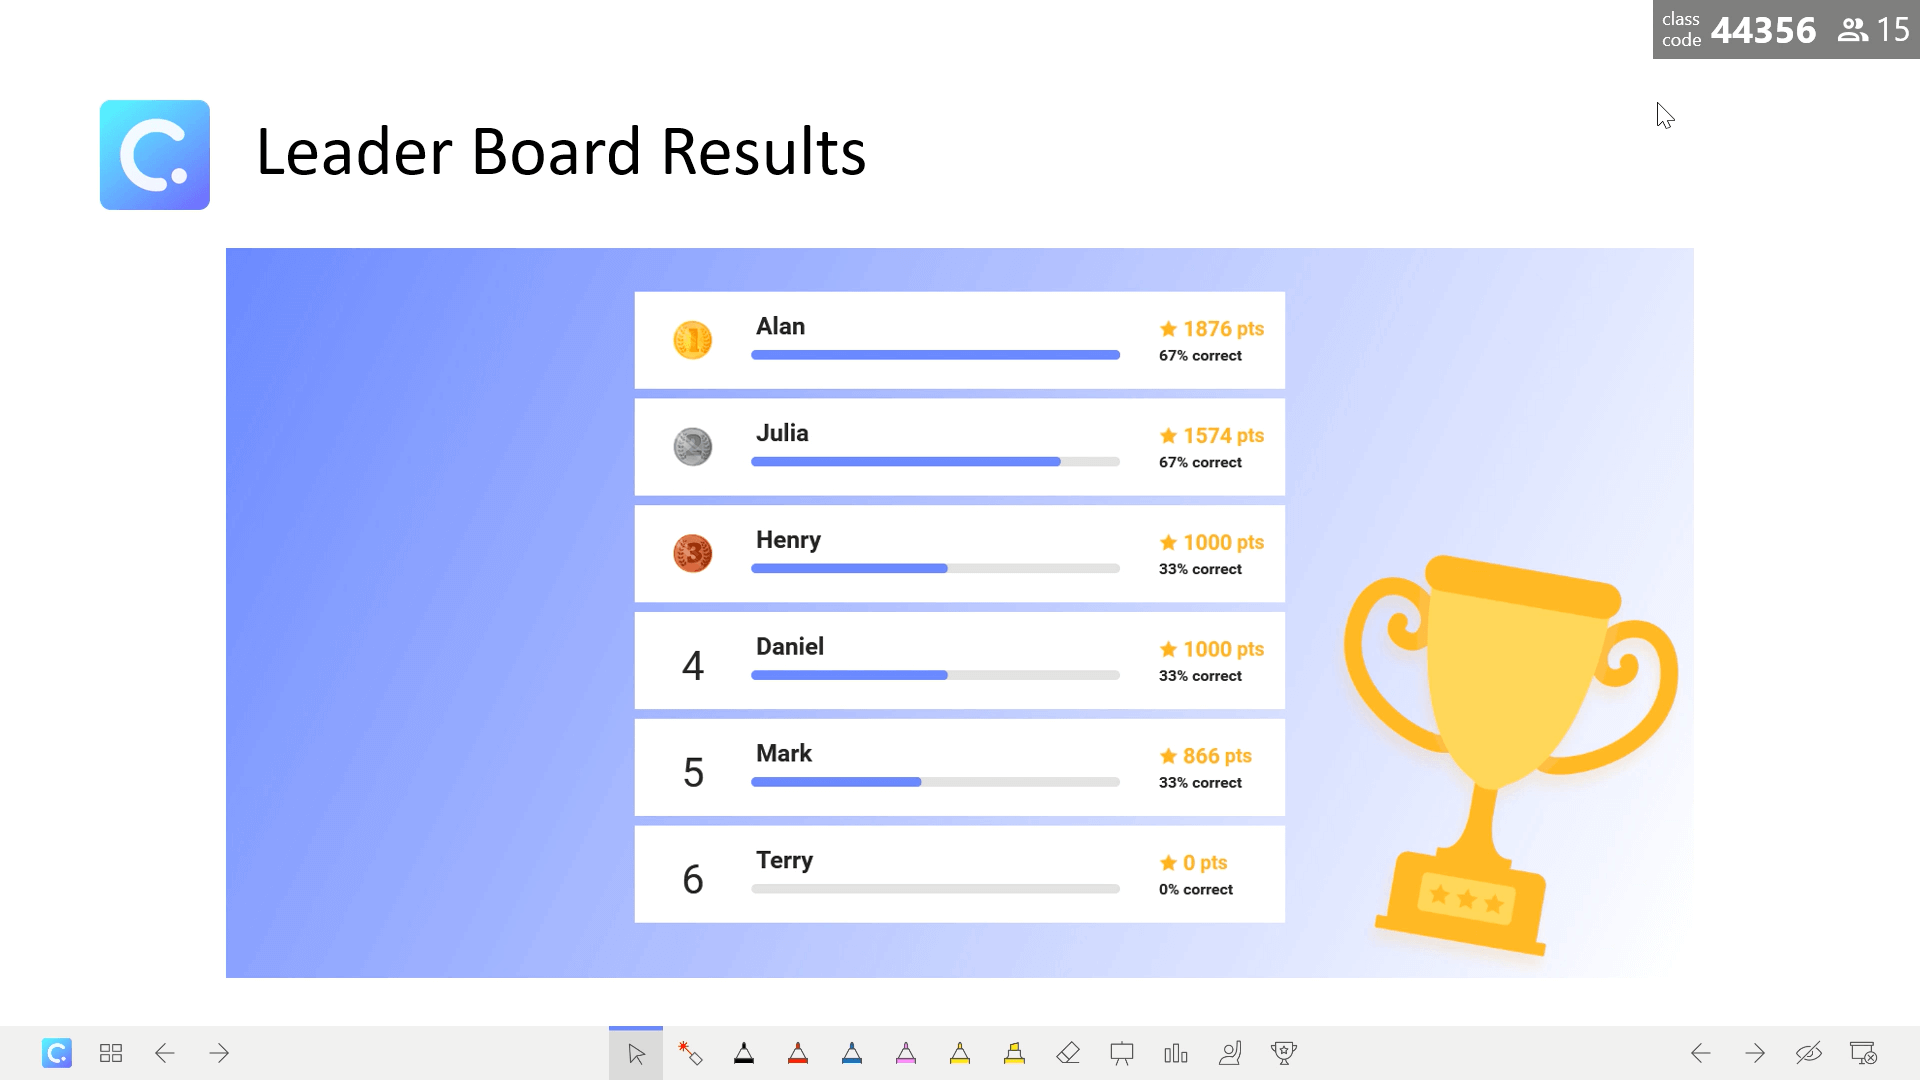
Once the whole quiz game is completed, take a look at the final leader board. This can be inserted as a slide into your presentation so that you can always refer back to the leader board even after the competition is over.
In addition to viewing the leader board in your slides, you can also view the leader board back in edit mode from the Leader Board icon in the top ribbon.
Click on the show table toggle at the top to view a complete comprehensive analysis of the quiz game. The table can be sorted by student for an easier way to record the data.
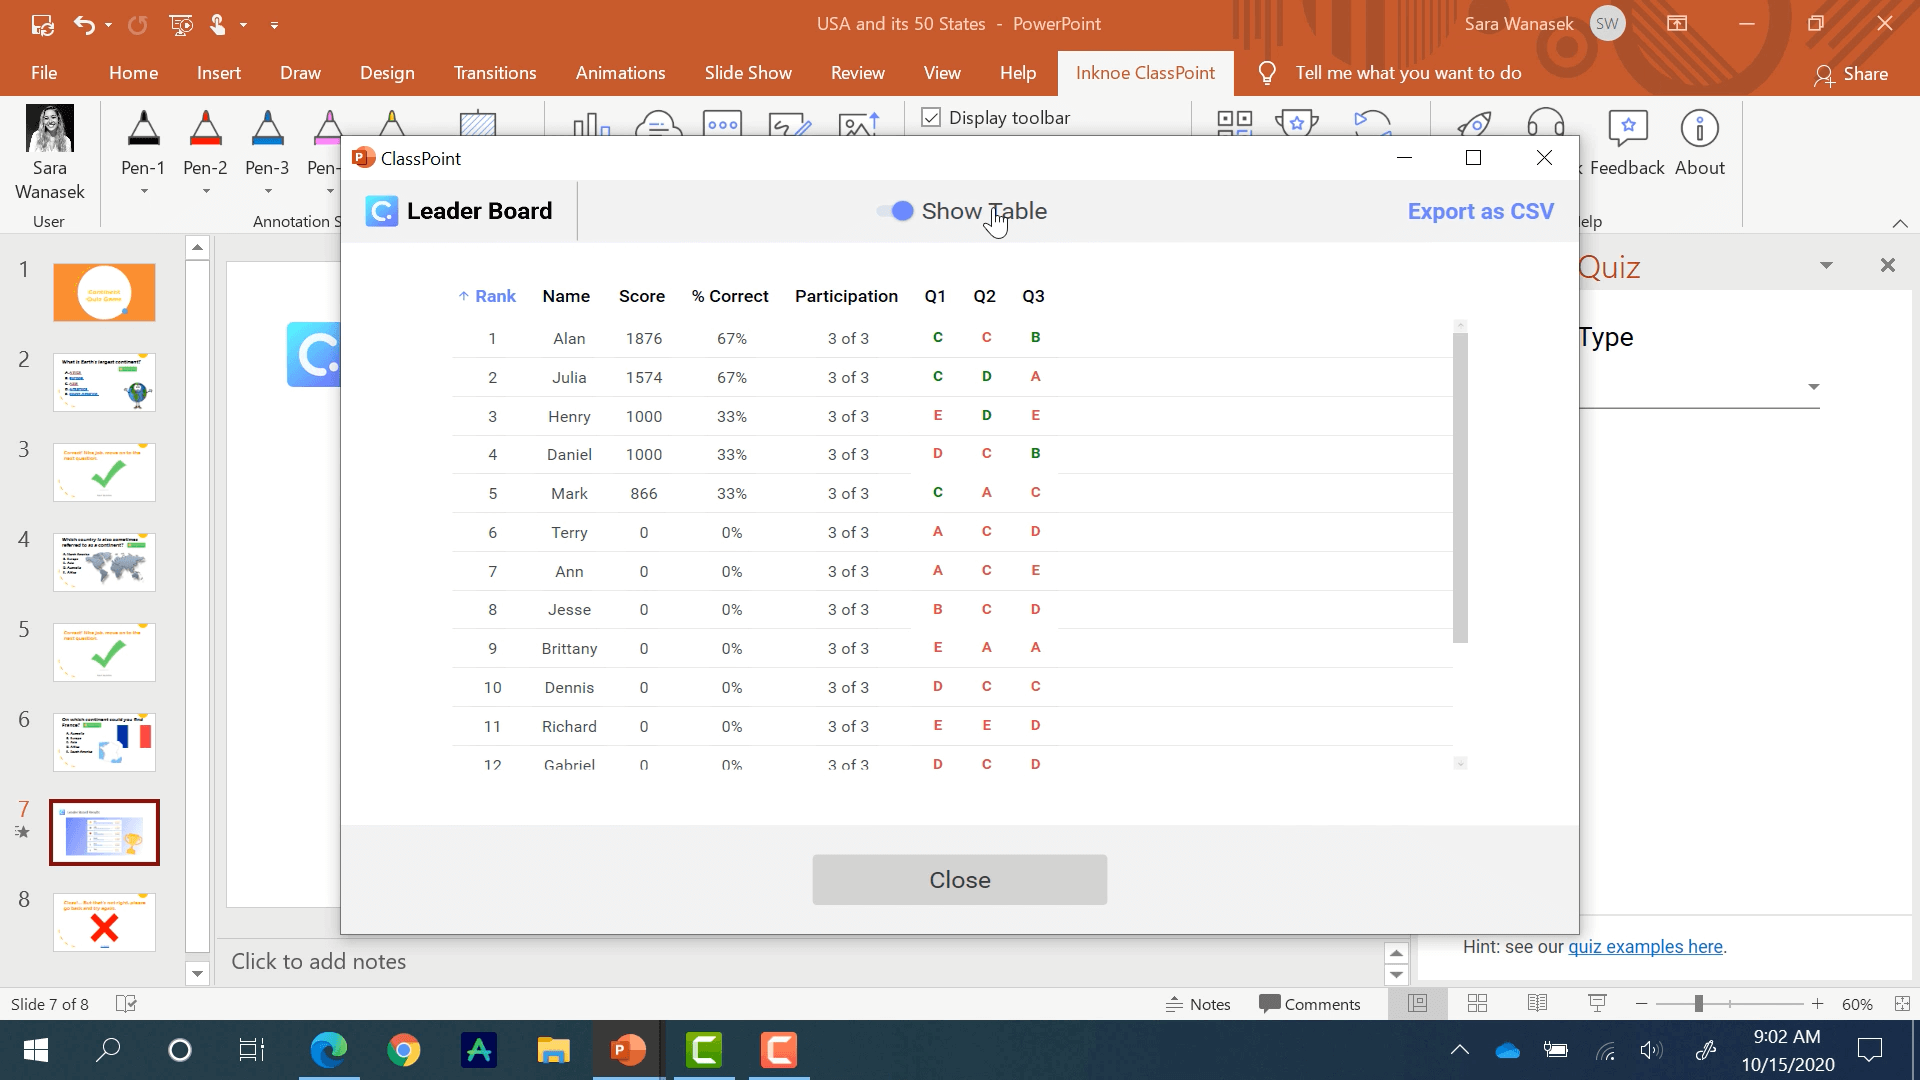
If this data is needed outside of PowerPoint, it can be exported as a CSV for your use.
Summary
Either of these two methods should fit your PowerPoint quiz game needs:
Adding Navigation Links to your slides is easy to grasp but it may be time-consuming depending on the length of your quiz. Plus you are not able to personally assess your students’ responses.
ClassPoint permits you to analyze your students’ responses and receive them instantly. In addition, you have access to powerful insights on your students without having to leave for another application.
There are plenty of other features in ClassPoint that you can use to engage your students, like being able to annotate on your slide, add whiteboard slides to your presentation, along with other question types you can add into your presentation. Let us know in the comments below if you would like to know about any of ClassPoints other features!