Using Microsoft Teams in the classroom gained popularity during the pandemic. However, it can, and is, being used in both online and physical classrooms today. As a learning management tool, Teams works seamlessly with other Microsoft products like Word, Excel, and PowerPoint which are classic favorites for students and teachers alike.
This multi-functional tool allows you to stay in touch with your students not only through video calls, but with chats, files, and assignments in Microsoft Teams. Teams can seem daunting when you first begin to use it, but it really is quite simple and easy to use. To make it seem less intimidating, we have broken down and explained some main features of Teams separately. Here are links to our other guides on features of Microsoft Teams:
- Microsoft Teams for Online Teaching – A Guide for Teachers
- Using Breakout Rooms in Microsoft Teams
- Assignments in Teams
- Class Notebook in Microsoft Teams
- 15 of the Best Teams Tips and Tricks.
Below is a quick, everything-you-need-to-know guide on assignments in Microsoft Teams. Let’s get started!
Create an Assignment in Microsoft Teams
To begin creating assignments in Microsoft Teams, you first need to be sure of two things:
- You are logged in with a Microsoft EDU account
- The Team you have created is a Class Team type
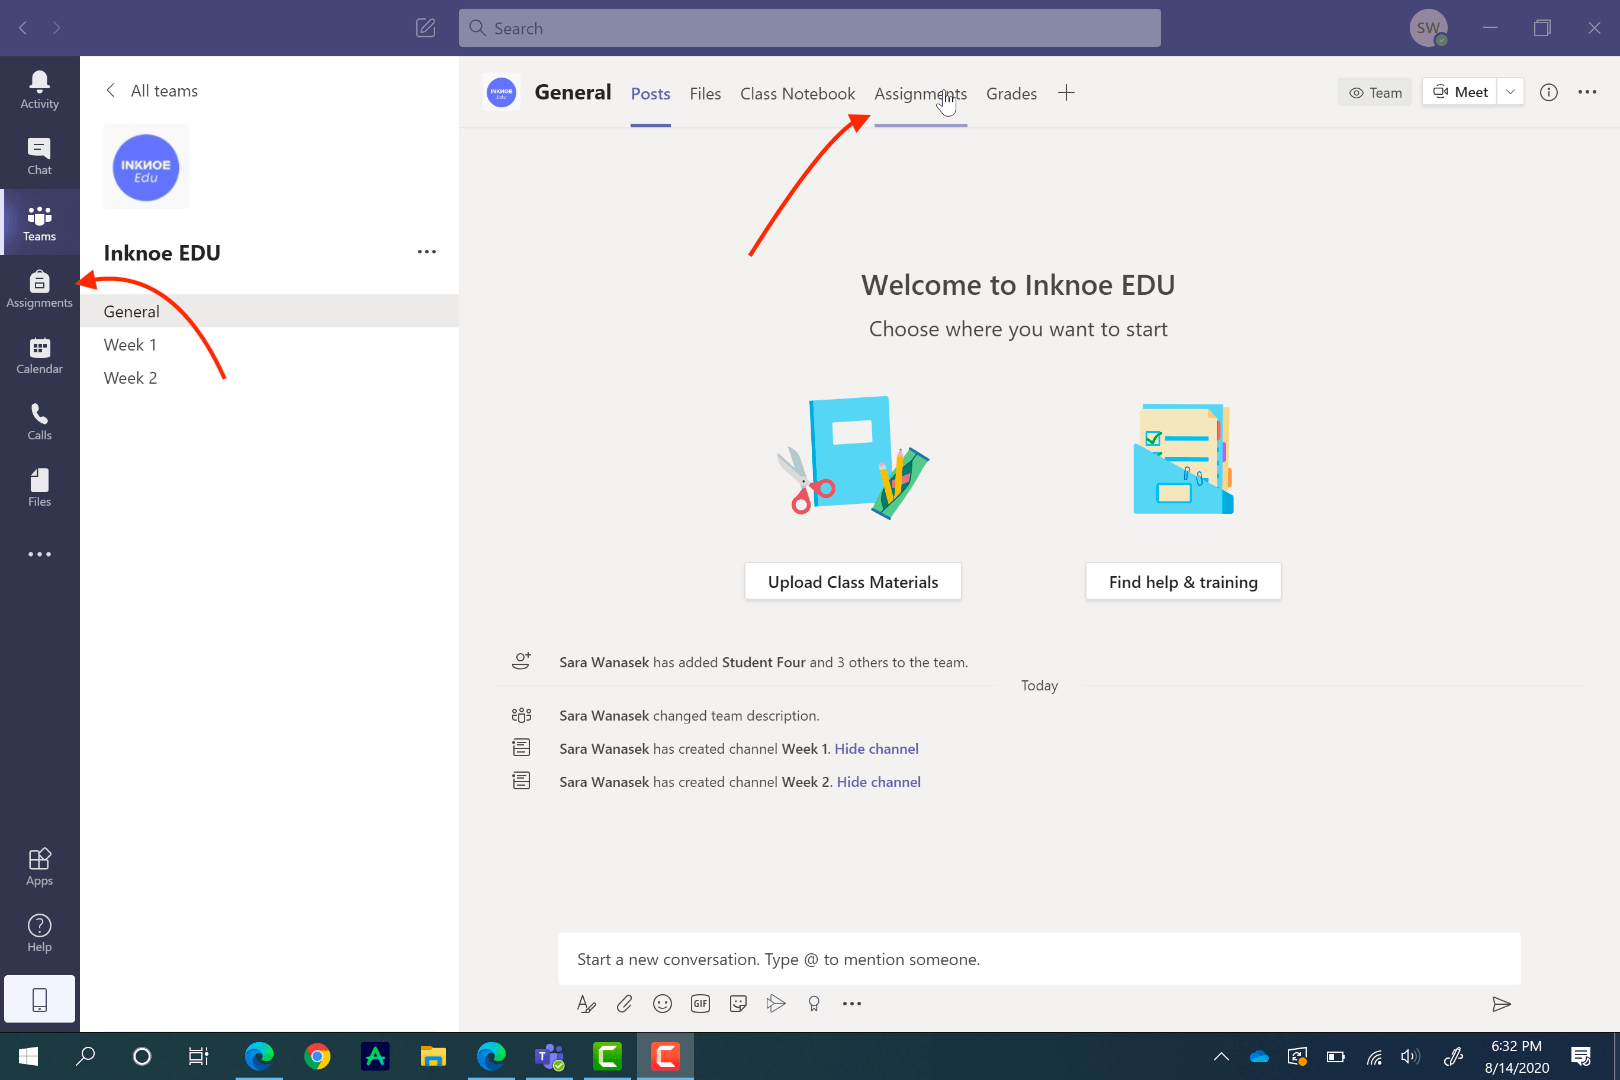
If both of those things are complete you will be able to see the Assignments tab on the side ribbon and on the top ribbon in the General channel. If you need help getting to know the interface and basics of Teams, check out our Teams Guide for Teachers.
Start a New Assignment
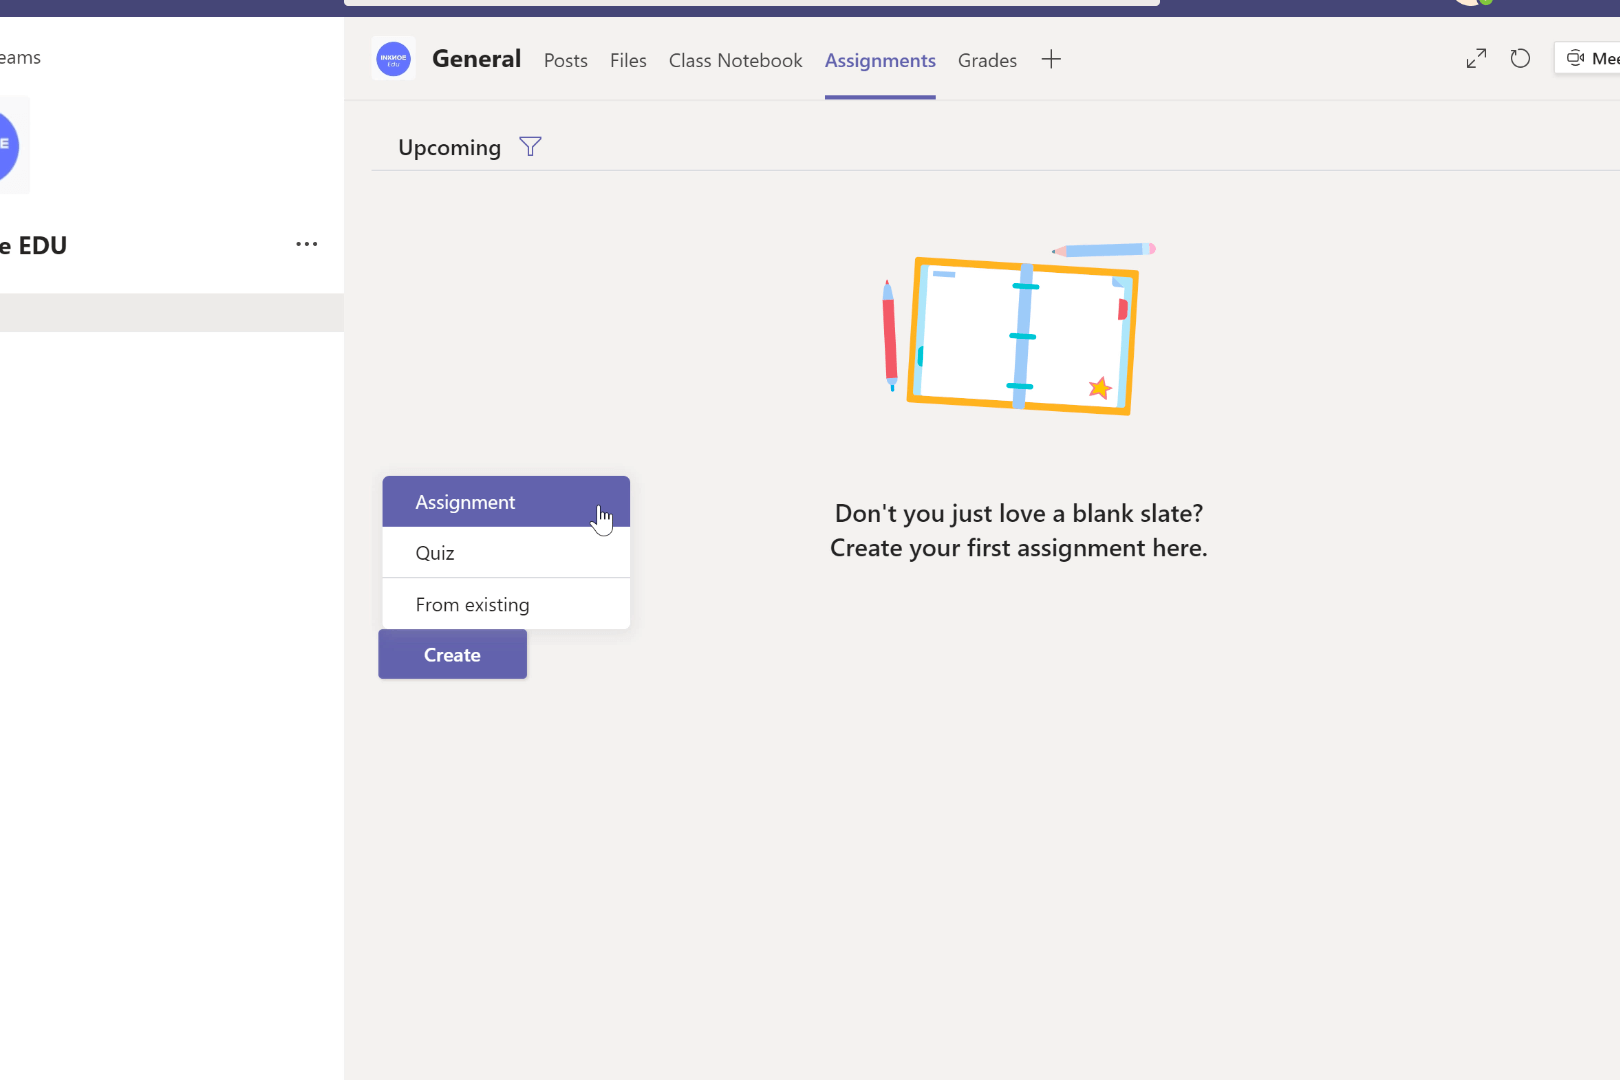
Now, to create your assignment, click on the Assignments tab from the top ribbon under your General Channel. Click Create, and then Assignment, to begin your first assignment. You can explore creating a quiz with the help of Microsoft Forms and creating an assignment based on a pre-existing assignment another time.
Add Assignment Details
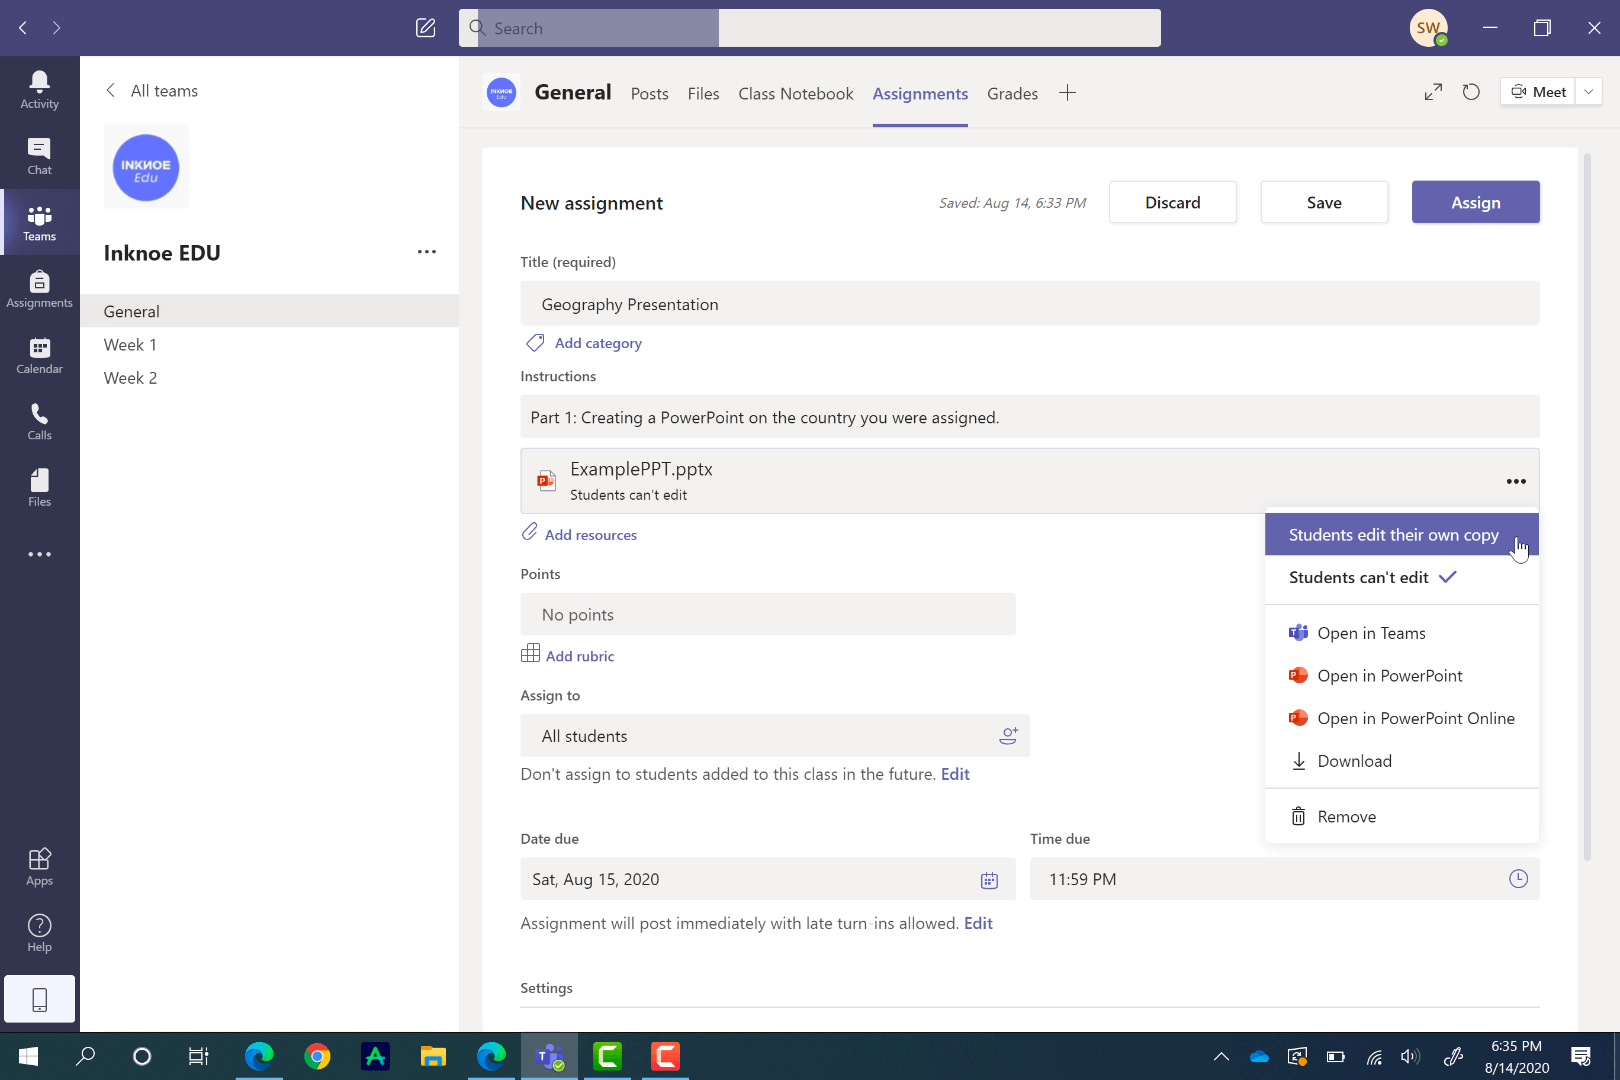
In your new assignment, add a title and a description to let your students know what to do to complete the assignment.
If you prefer to attach the instructions as a document, or have supporting materials to the assignment, you can attach them under the Add Resources link. Teams allows you to attach files in many different ways: through your OneDrive, ClassNoteBook, from a link, by creating a new file, or from uploading a document from your computer.
When you attach a resource, you have the option to allow students to edit it or not. By default, they cannot edit; however, if you prefer to change this, just click on the three dots at the end of the resource and click, Students edit their own copy. Now, when students edit this file, a new copy will be made for them, and it is automatically attached to this assignment for an easy turn-in.
Set Points and a Rubric
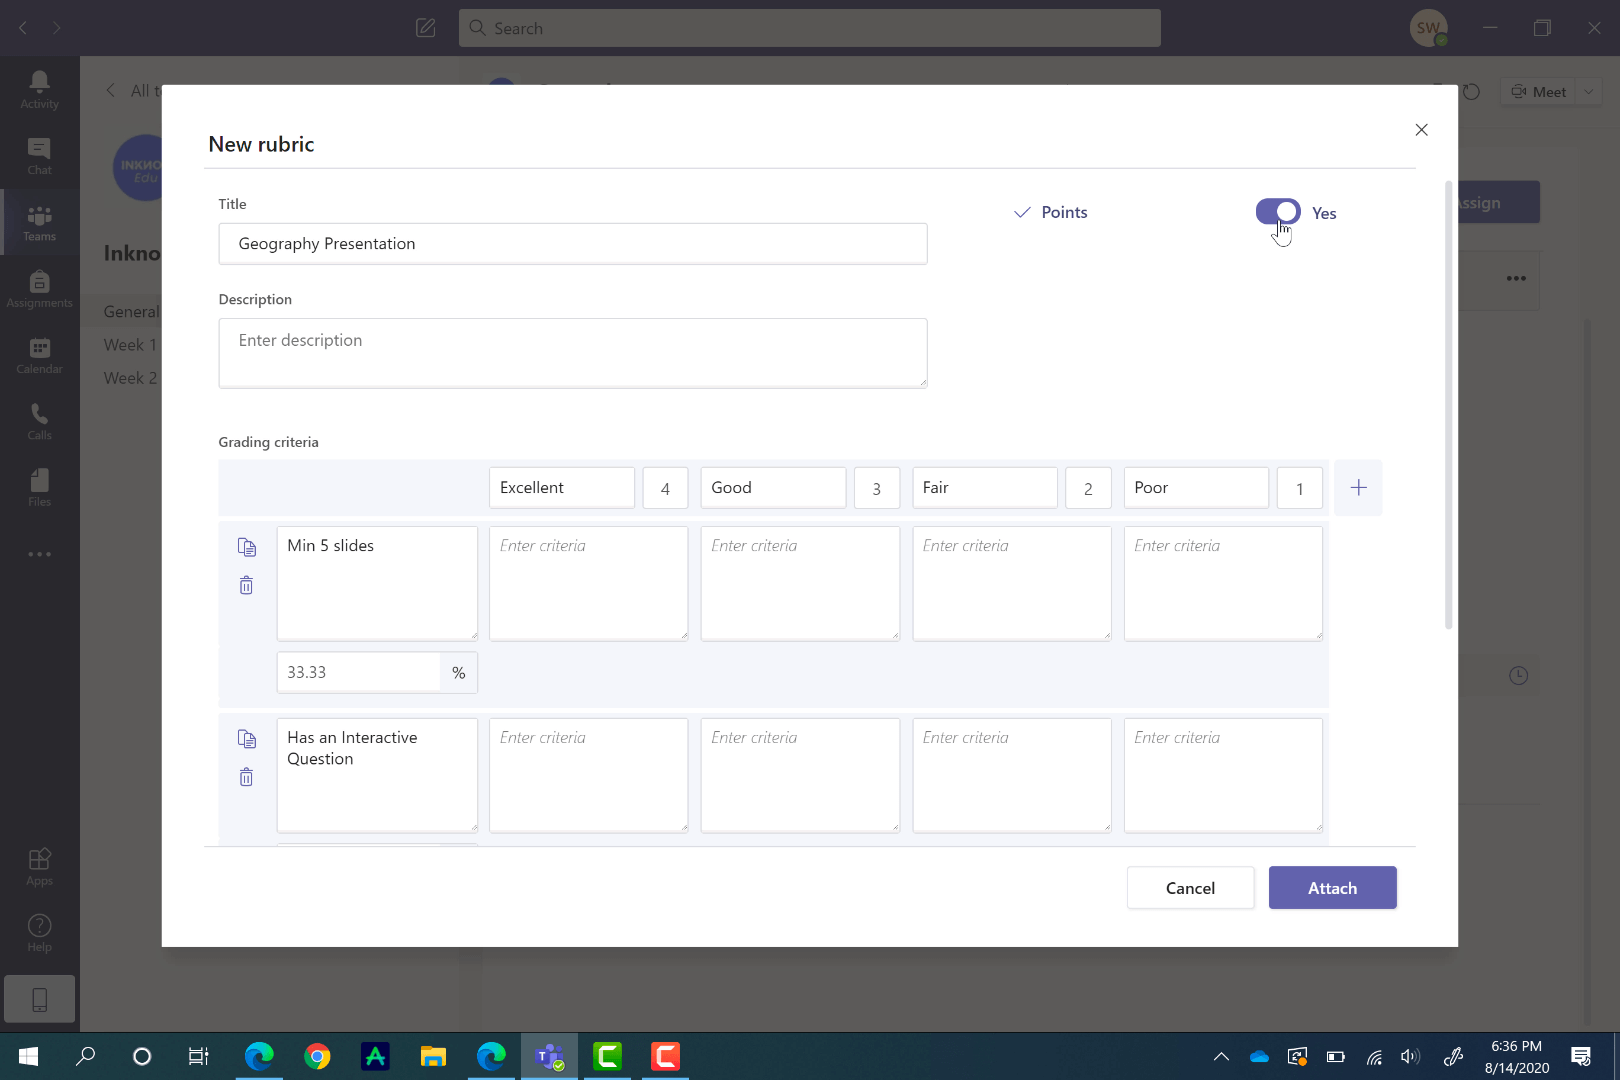
To easily grade this assignment in Teams, assign the number of points it is worth, or add a rubric. Similar to creating assignments, you can use a pre-existing rubric, upload one, or create a new one.
Creating a new rubric is very customizable so you are able to add all the information your students need to complete the assignment. Just add a title, and a description, then fill in the rest of the rubric. If you need more categories, just click the plus button at the end of the columns, or after the bottom row. In addition, you can assign points to each category of the rubric.
Choose Students to Assign the Work to
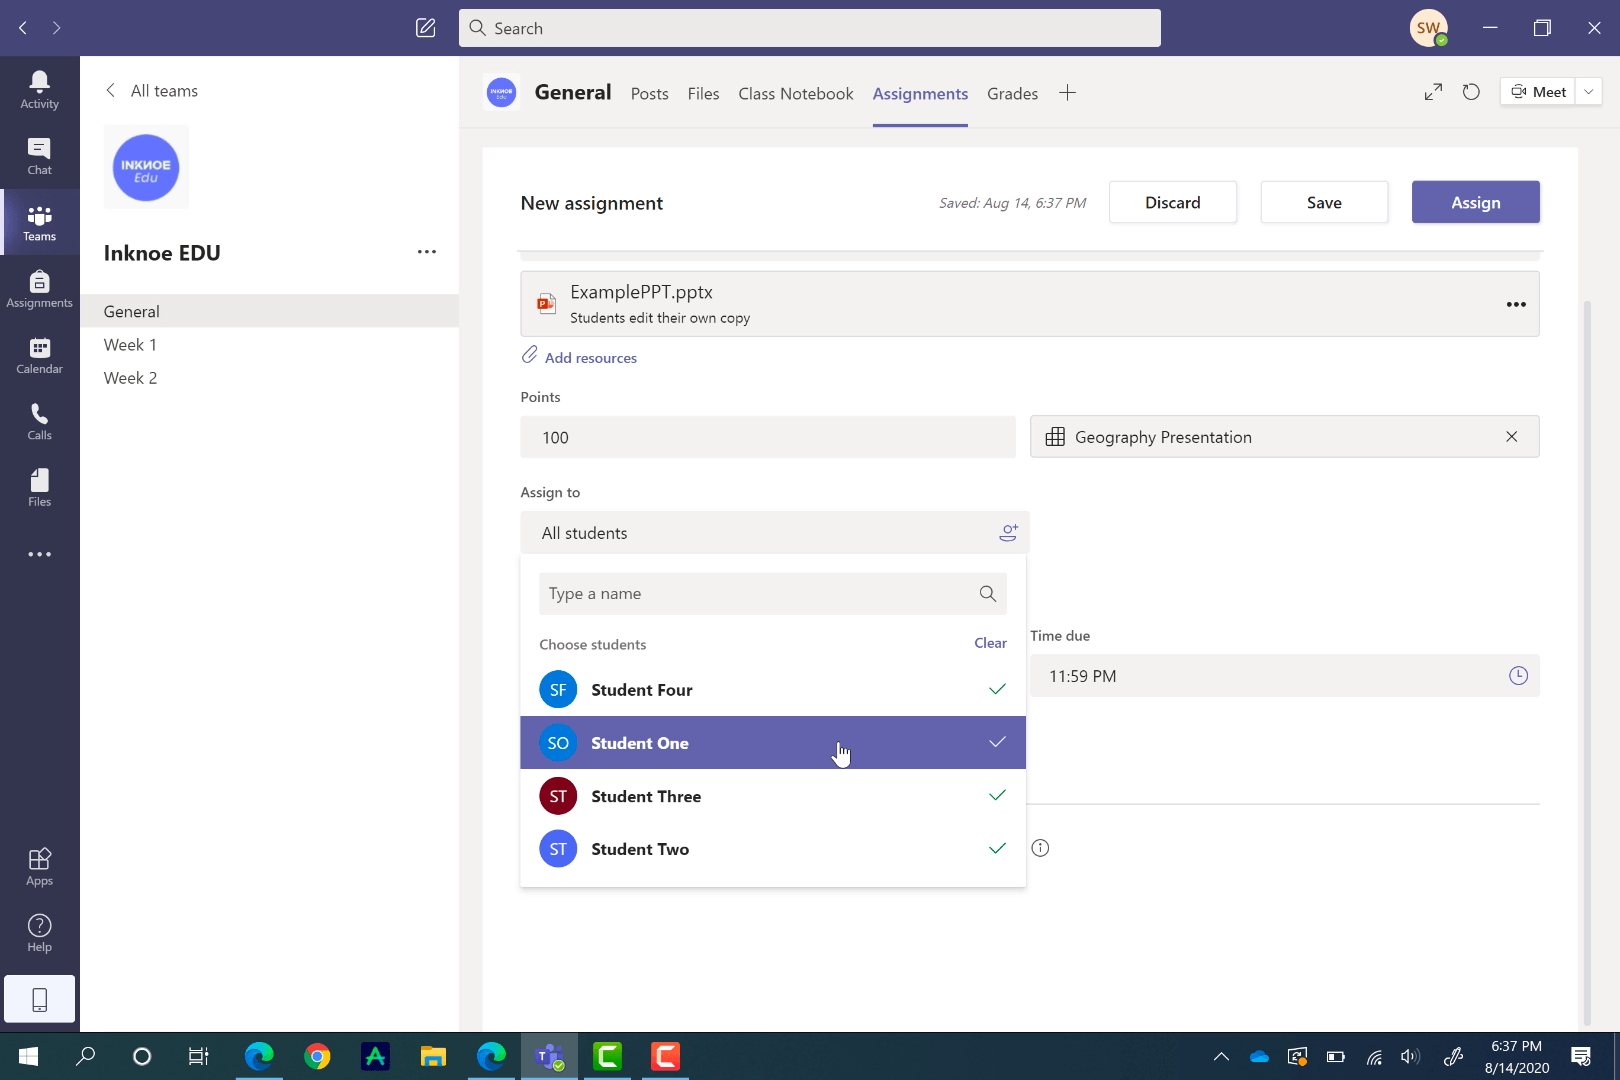
The next step in creating an assignment is to assign it to your students. You can assign it to all of them, or a certain student(s) for more individualized work. Just click Assign to All, or go through the list and click the students you would like to assign this to.
Give a Due Date & Close Date
In Teams, there are two different categories of dates for when the assignment is due.
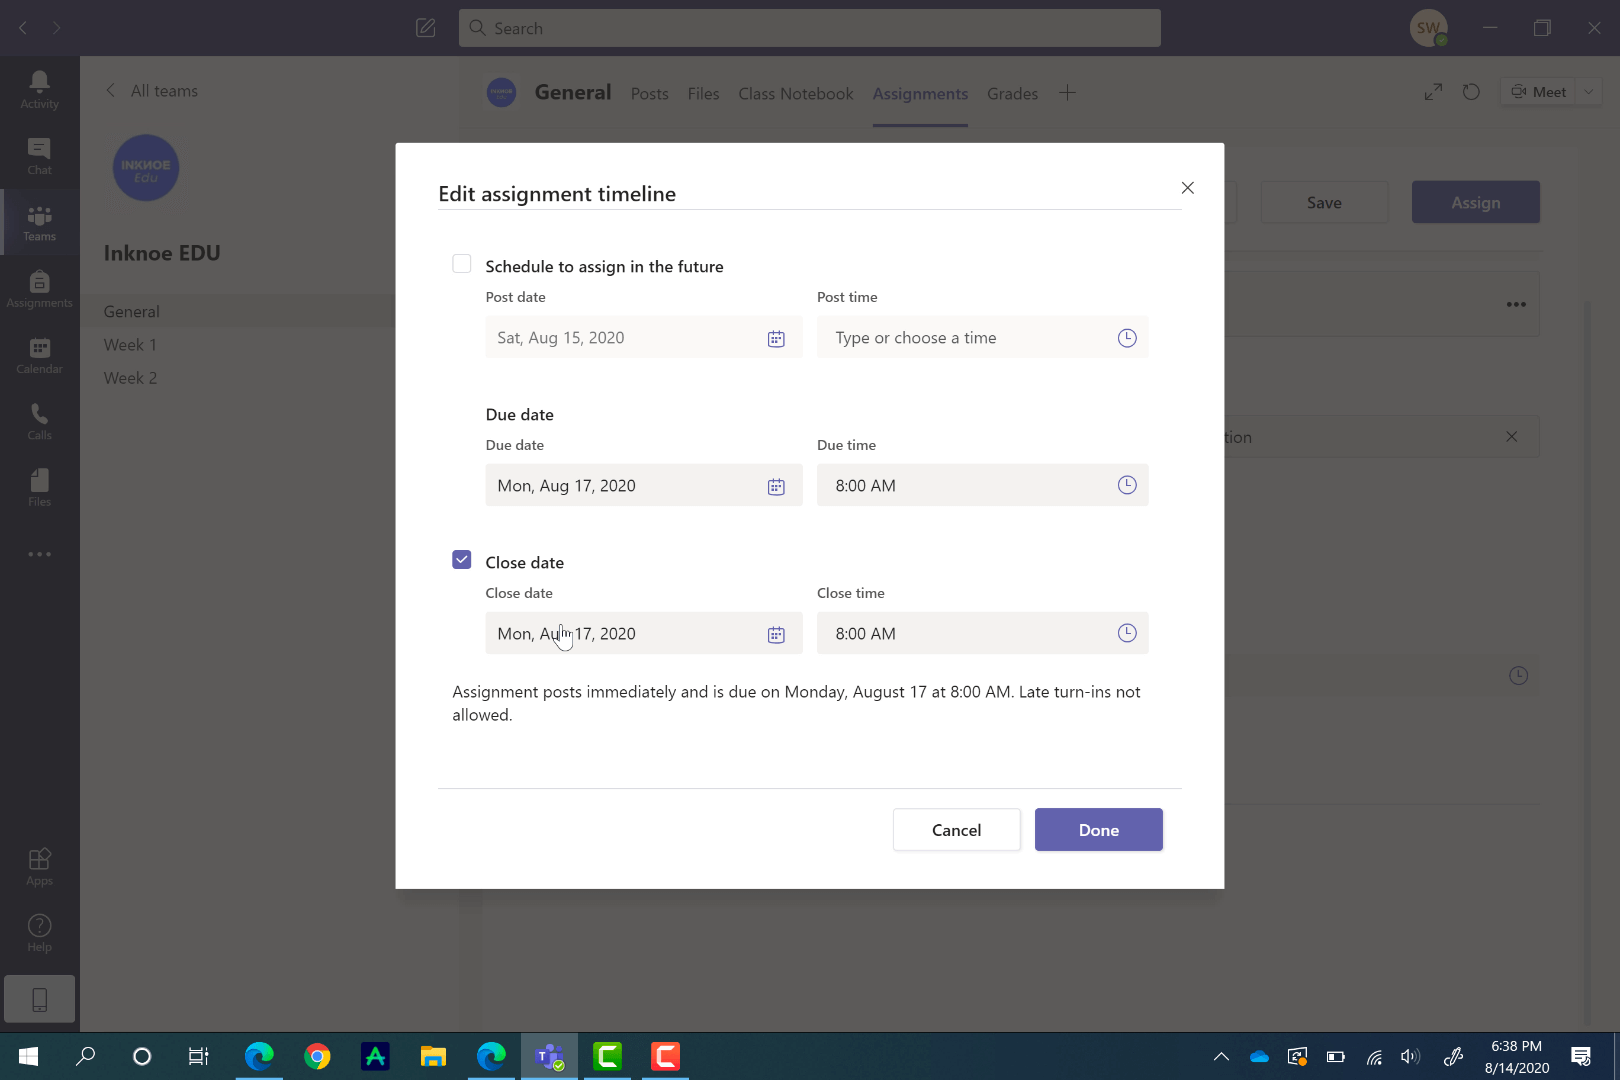
Due Date: This is when the assignment is due, however, students are still able to turn in the assignment late, after the due date has passed.
Close Date: This is when the assignment closes and no more submissions are allowed.
To set both of these, and schedule this assignment for the future, click Edit under the Due Date section. To set a Close Date, click the checkbox on the side and set the date.
When all of your setups are complete, back at the top of the page, click assign, or save for later if it still needs a bit more work.
How Students Can Turn in Assignments
After you assign an assignment, students will receive a notification. They are able to view the assignment in the General Channel or on the Assignment tabs.
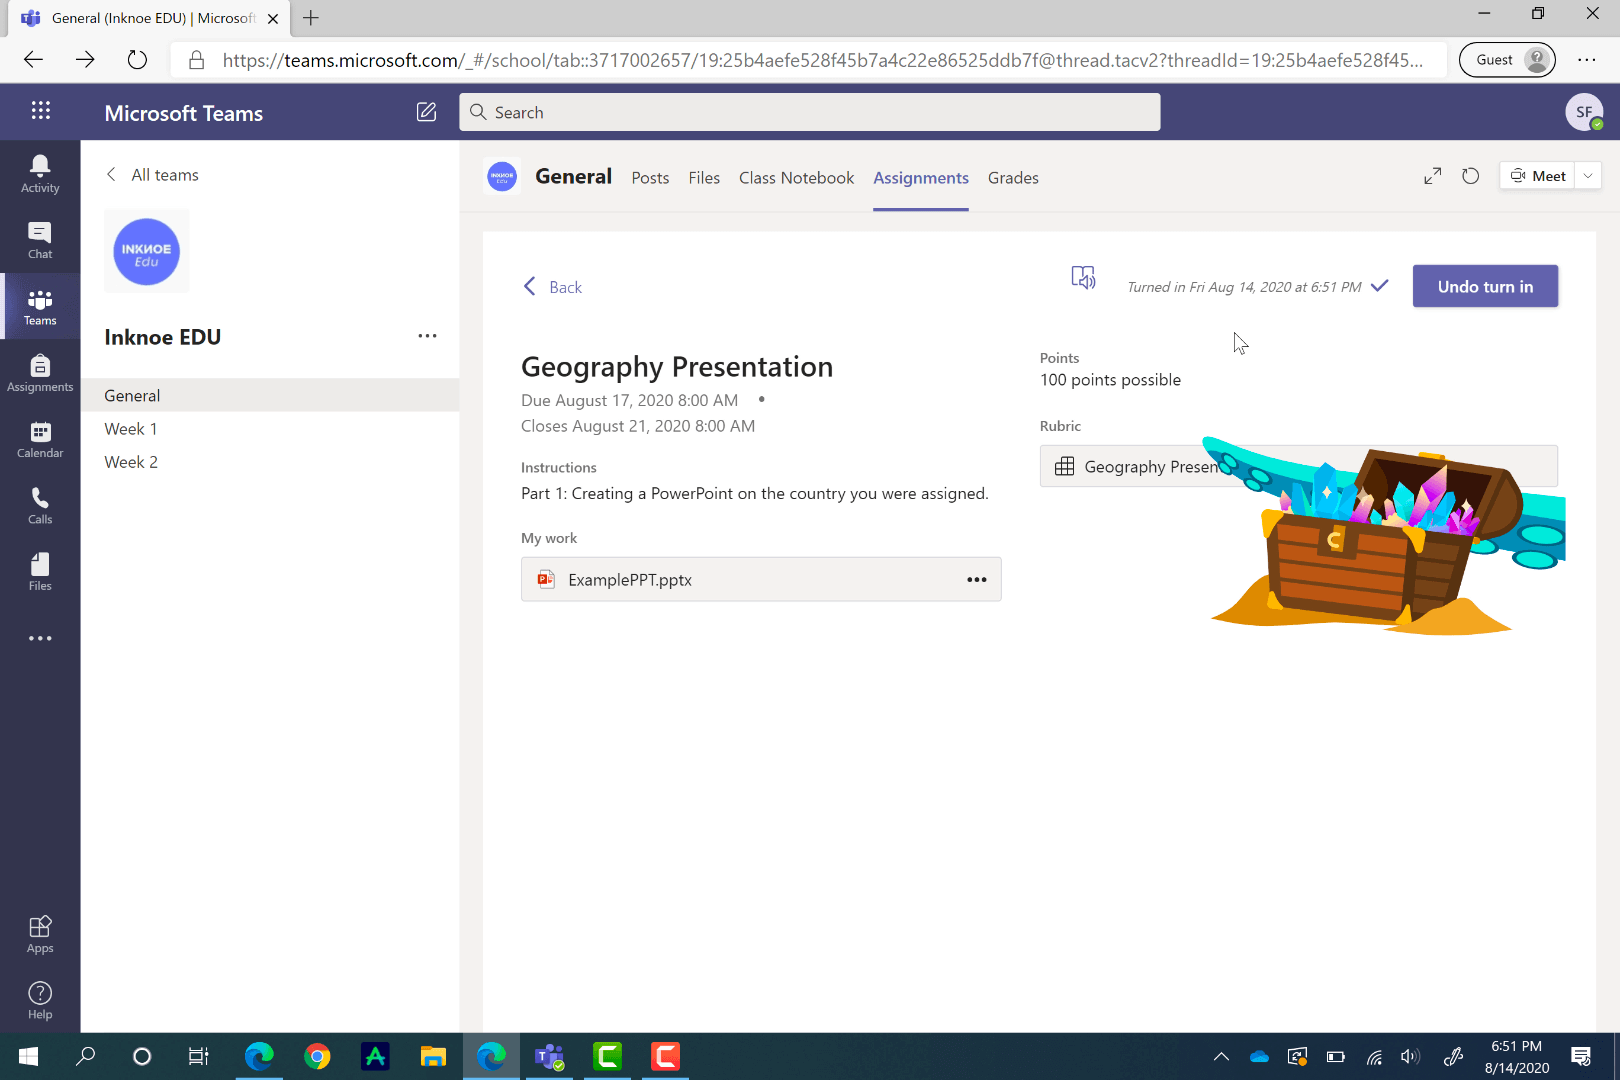
The student’s view of the assignment is very similar to the teacher’s view. They will see the Due Date and Close Date, the instructions, any files you have attached, and a rubric if there is one.
Students can begin their assignments right away in Teams if you have attached a document for them to work on. In the example below, students would be using PowerPoint on their desktops simultaneously with ClassPoint to make their presentations more interactive. As they work, their changes will be saved automatically. If you don’t have a document attached, students can upload and attach their work instead.
When they have completed their work, they just need to click Turn In. They will see a fun animation appear indicating the turn-in is successful.
How to Grade Assignments
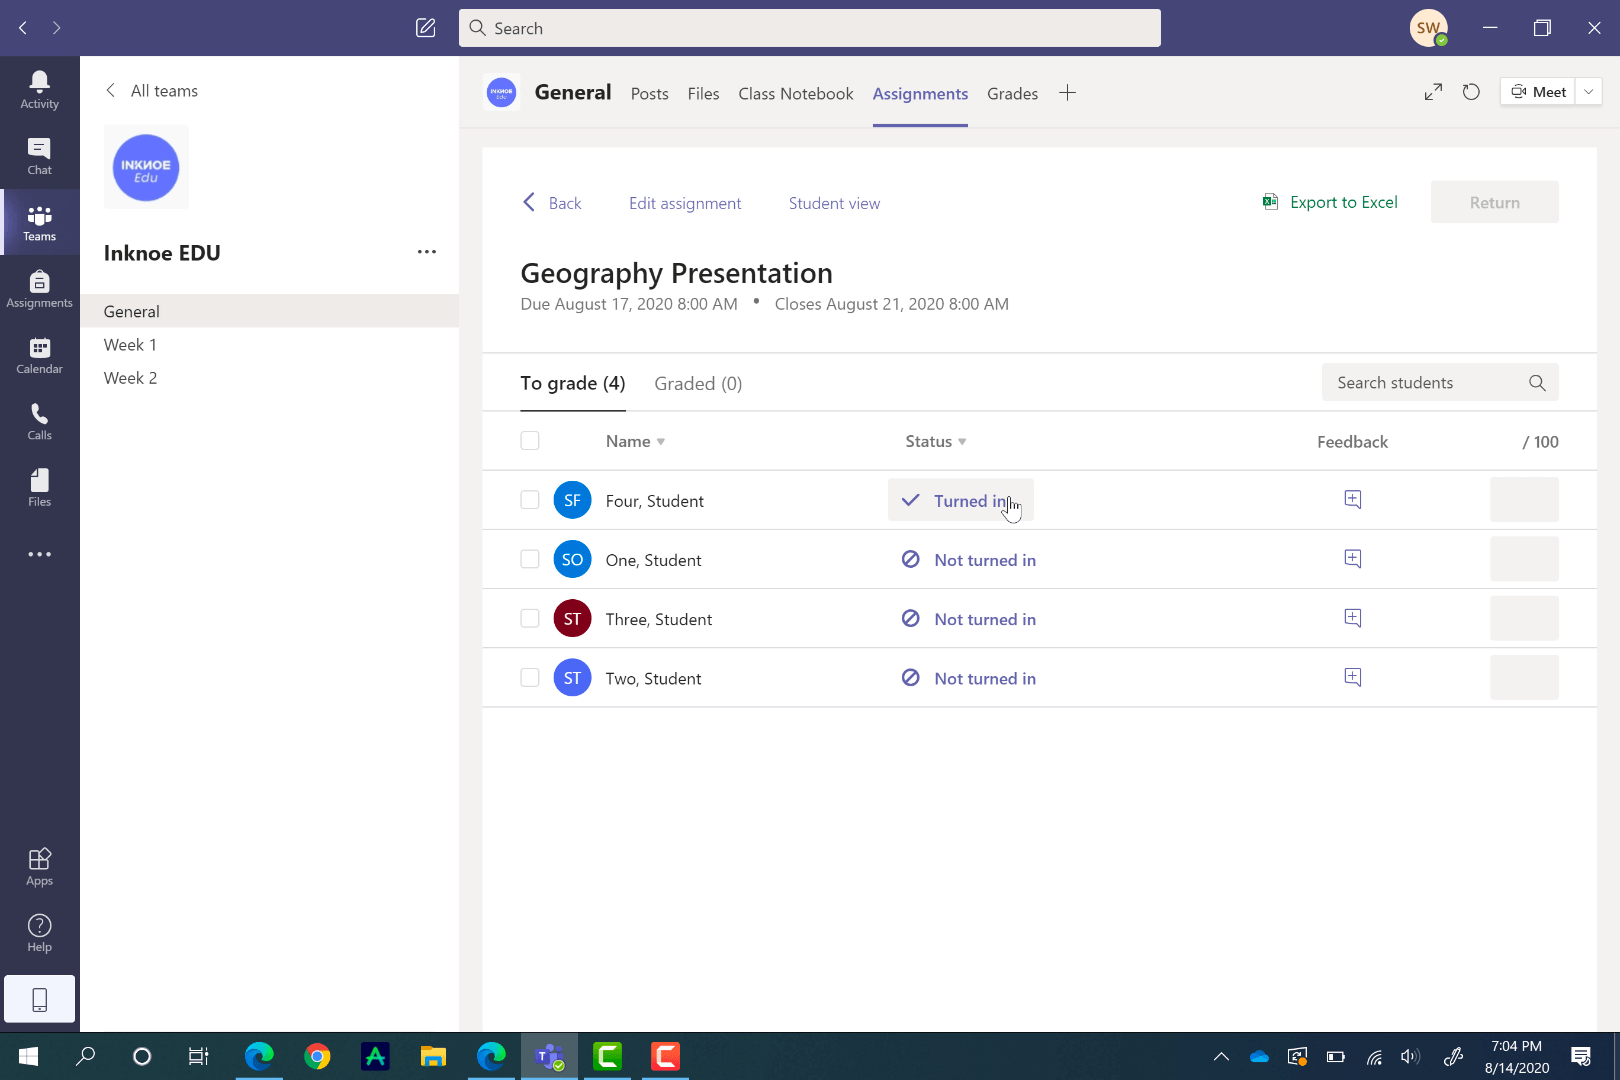
Once students have turned in their work, you will receive a notification. Now, you can easily look over and grade their work. Click into an assignment to view how many students have turned in their work, how many need grading, and how many you have already graded.
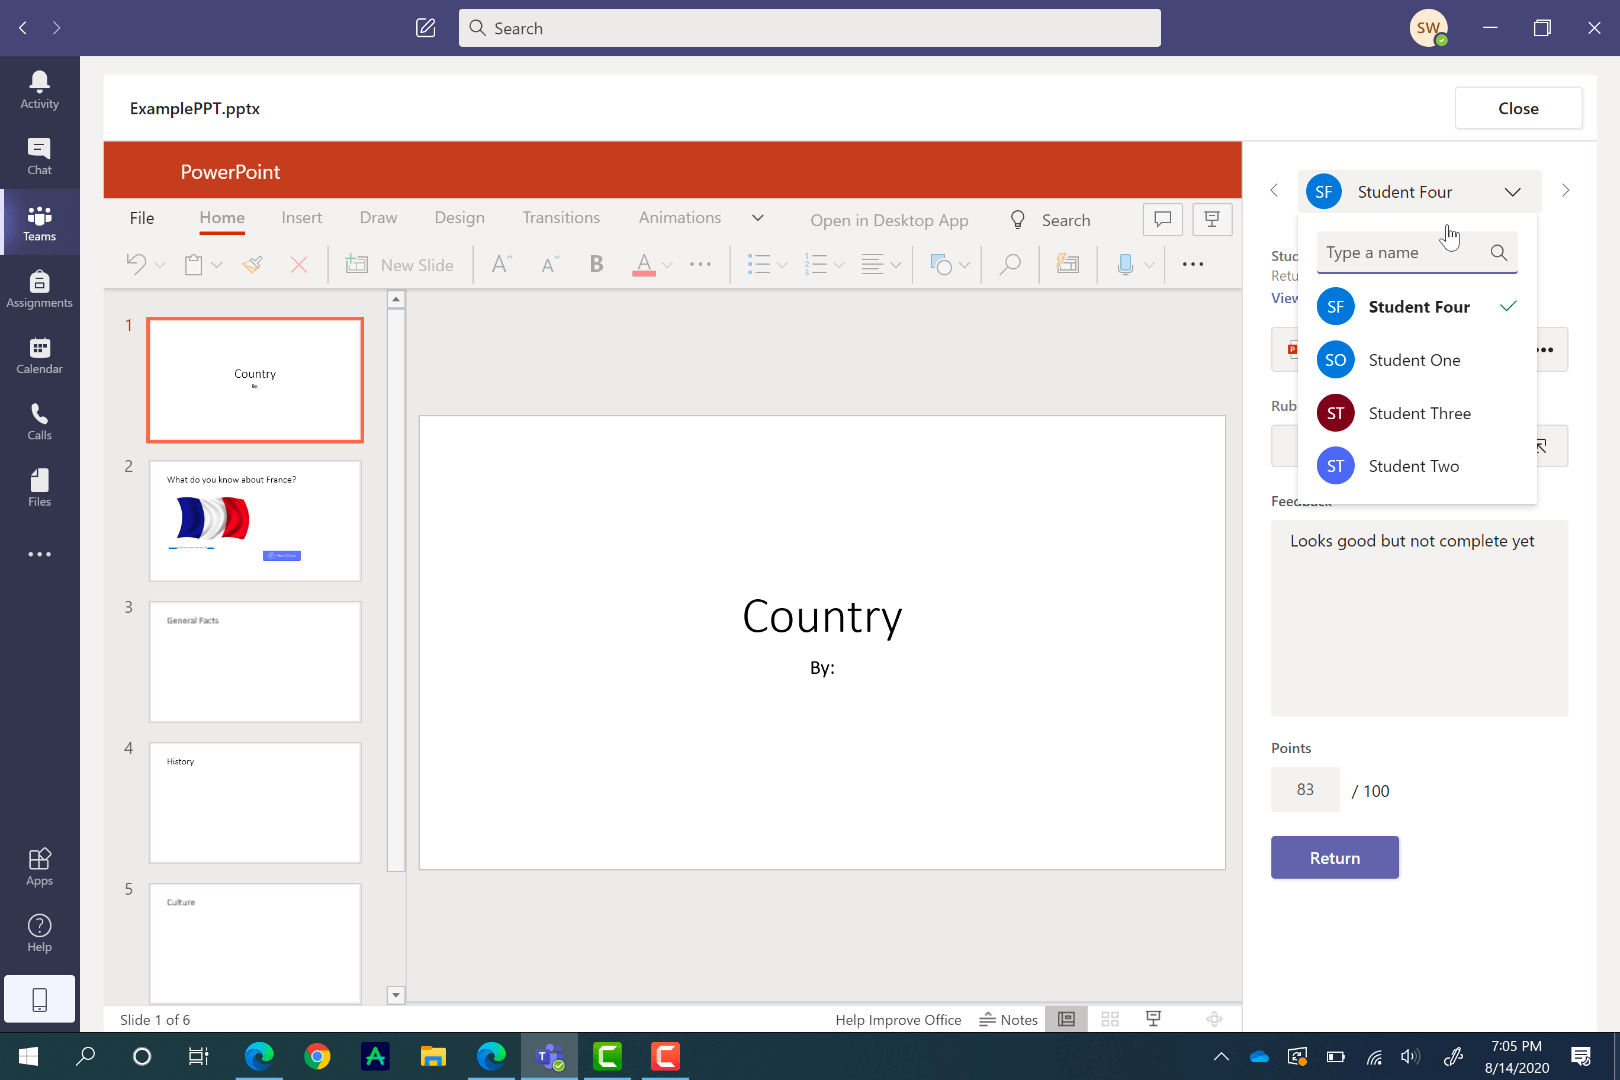
To grade an assignment, click on the Turned in status. Here, you are able to view their work alongside a tab for you to give them feedback. If you have a rubric, it will open for you to assign the points for each category. Scrolling down, you can leave feedback to let them know what they excelled at and what needs more work.
When the grading is completed, you can return it to the student. They can view your feedback, make changes, and turn it in again if necessary.
To easily jump between students for a continuous grading experience, click the arrows on the side of the student’s name, or click on the student’s name for a drop-down menu of your other students.
Export Grade Data
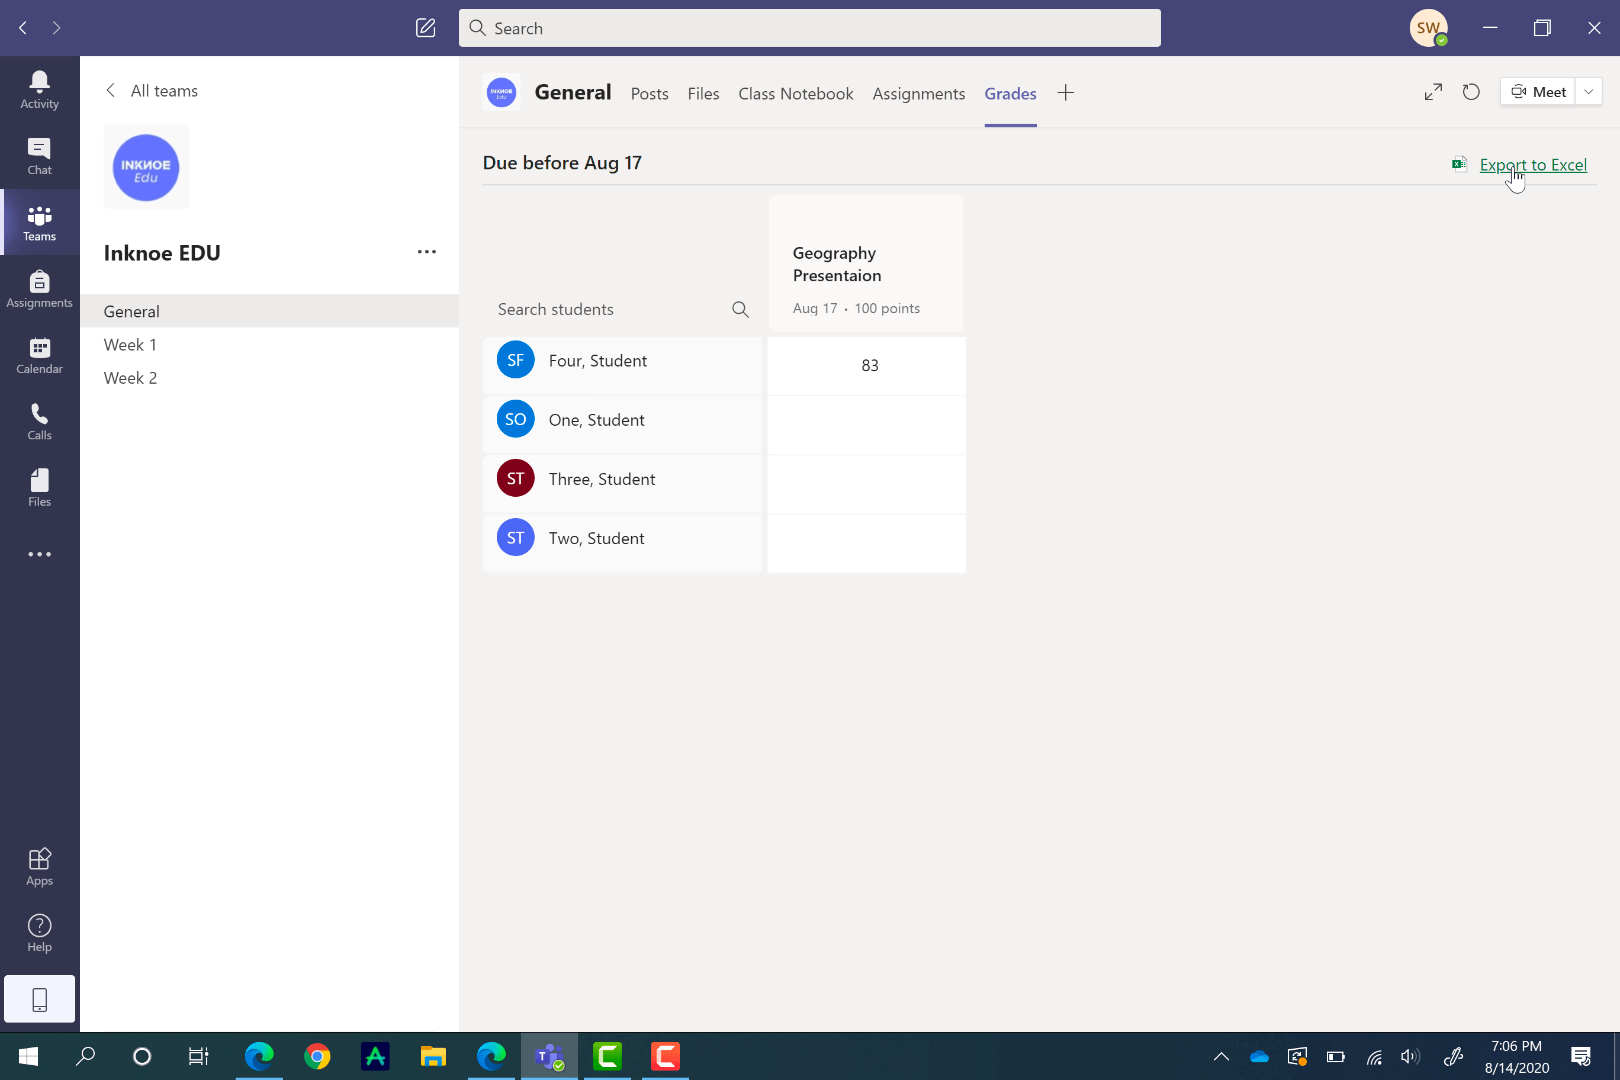
In Teams, it is really easy to export data, especially for assignments. You can export data for certain assignments, in addition to exporting all assignments and student grade data. This can be done from the Grades pivot on the top toolbar. You will see a complete list of your students, and of each assignment on this tab that you have assigned throughout the year.
Frequently Asked Questions
And that completes this tutorial on Assignments in Microsoft Teams! There is plenty you can do with this feature on Teams to make it suitable for your students and classroom. Enjoy using it to its fullest potential.
We have put together some frequently asked questions in case you still have some lingering questions before you get started!
What if I don’t see the Assignments tab?
If you don’t see the Assignment tab on the top ribbon in your General channel, or on the side ribbon, you are not logged in with a Microsoft EDU account. Create your own, or get in touch with your IT department for your login.
What is the difference between the Due Date and the Close Date?
Students can still turn in Assignments after the Due Date has passed, but once the Close Date has passed, no more submissions are allowed.
If I return the assignment to my student does that mean I want them to redo it?
Not necessarily. You can return all assignments to the students so that they can see your feedback. If you want a student to redo the assignment, you should let them know in your feedback.
Can I attach a PDF for my students to edit to the assignment?
You can do this through your Class Notebook! Insert the PDF to a Class Notebook page and set it as the background. Then, you can assign this page to your students.
Watch this for a visual guide on how to insert a PDF to a Class Notebook page.
Can I assign an assignment to a certain channel?
Unfortunately, no. You can only assign to the General Channel, which is all your students, or assign to individual students when setting up the assignment.
Hi, this is a really useful guide! I am wondering if it is possible to view/download the feedback given to the students once it has been assessed?
We need to internally verify the learner work and feedback show it to the external moderator for quality checking and so far I cannot find a function to download the feedback given.
Have you come across anything yourself?
Best wishes,
Lauren
Hi Lauren, I haven’t come across this feature yet. I do know you can download assignments with SharePoint, but not sure the feedback is downloaded as well. Sorry we couldn’t be more help.